Straight and Level: Attitude, Power and Trim
What straight-and-level flight actually requires: holding heading and altitude, how pitch attitude, angle of attack, flight path, power and trim work together, and how a brief instrument cross-check catches small errors before they grow.
Independent educational resource; not approved flight training. Jonas Aviation is not an approved training organisation, and nothing on this page replaces formal instruction or approved aircraft manuals.
What you will learn
- Define straight-and-level flight as maintaining heading and altitude, and distinguish it from flying one fixed airspeed.
- Distinguish pitch attitude, angle of attack and flight path and state the reference each is measured against.
- Explain how pitch and power interact in level flight and why the pitch-for-airspeed, power-for-altitude shorthand is a simplification rather than a rule.
- Describe trim as relieving sustained control pressure after the attitude is established, not as flying the aircraft.
- Apply a brief instrument cross-check to recognise and correct common straight-and-level errors, including wind drift between heading and track.
On this page
Straight-and-level flight looks like the simplest thing in aviation: point the nose somewhere, hold the height, and nothing much happens. It is one of the first manoeuvres a student is taught, and the FAA's Airplane Flying Handbook builds everything else on it, because turns, climbs and descents are all variations from straight and level. This lesson defines the manoeuvre precisely, separates the three things beginners most often blur (pitch attitude, angle of attack and flight path), explains how pitch and power actually interact, and shows why trim and a brief instrument cross-check are what keep the aircraft steady rather than your hands.
Straight and level: what the two words mean
The Airplane Flying Handbook defines straight-and-level flight as flight in which heading and altitude are maintained. Two separate jobs hide inside that sentence, each with its own reference:
| Part of the manoeuvre | What is held steady | Primary references |
|---|---|---|
| Straight | The heading: the direction the nose points | Wingtips level against the horizon, confirmed on the heading indicator |
| Level | The altitude above the pressure datum | Nose reference point held against the horizon, confirmed by altimeter trend (the vertical speed indicator as support) |
Straight flight is never perfectly still: the air moves and the aircraft drifts off, so small corrections happen constantly. The Handbook's point is that any bank, however small, produces a turn, so deviations are caught early and corrected with coordinated aileron and rudder rather than rudder alone.
Level flight does not mean one fixed airspeed. The Handbook notes that, for all practical purposes, airspeed stays constant in straight-and-level flight if the power setting is also constant, and pilots deliberately change speed with the power while staying straight and level. The Pilot's Handbook adds that straight-and-level flight may be sustained at a wide range of speeds: the pilot coordinates angle of attack and thrust in every speed regime to hold altitude.
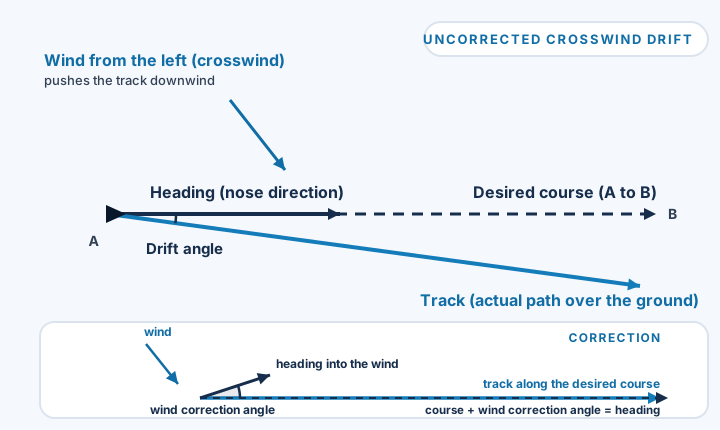
Heading is not track
Wind separates where the nose points from where the aircraft actually goes. The navigation chapter of the Pilot's Handbook keeps the terms precise, and the difference is exactly where beginners get lost:
| Term | Meaning |
|---|---|
| Course | The intended path over the ground |
| Heading | The direction the nose points during flight |
| Track | The actual path made over the ground |
| Drift angle | The angle between heading and track |
| Wind correction angle | The heading offset applied so the track coincides with the course |
In still air, track and heading are the same direction. With wind, the track combines the aircraft's motion through the air with the motion of the air itself, so a steady heading in a crosswind walks away from the line you planned. Holding the heading is necessary but not sufficient: something on the panel, or outside, must confirm that your track is also staying where you want it. Correcting that drift is navigation (a wind correction angle pointed into the wind), not a control error, which is why the ideas are taught together but kept distinct.
Attitude, angle of attack and flight path
Three different quantities get called "how the aircraft is pointed", and each is measured against a different reference:
| Quantity | What it is | Measured against | What it describes |
|---|---|---|---|
| Pitch attitude | The angle between the aircraft's longitudinal axis and the natural horizon | The horizon (seen outside, or shown on the attitude indicator) | Where the nose sits relative to the horizon |
| Angle of attack | The acute angle between the wing's chord line (an imaginary straight line from the leading edge to the trailing edge) and the direction of the relative wind | The relative wind, set by the aircraft's motion through the air | How hard the wing is working: what the wing feels |
| Flight path | The direction the aircraft actually moves through the air | The air mass; over the ground its path shows up as the track, shifted by wind | Where the aircraft is actually going |
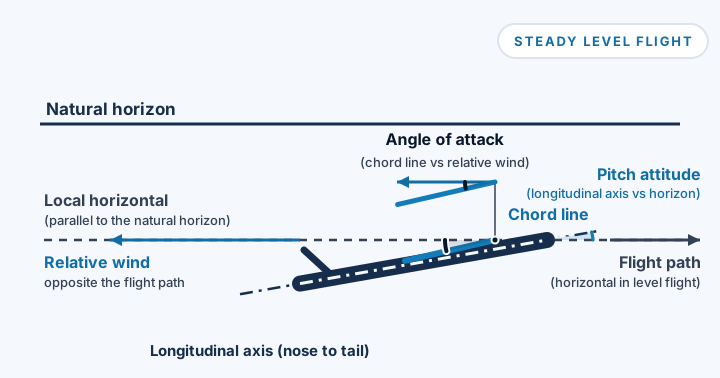
A useful way to keep them apart: pitch attitude is what you see, angle of attack is what the wing feels, and the flight path is where you end up. In steady level flight the flight path is horizontal, the relative wind is horizontal, and the two angles rise and fall together, so pitch attitude acts as a good stand-in for angle of attack. The moment the path is not level, or the airflow is disturbed, they part company: the relative wind follows the flight path rather than the horizon, so the same pitch attitude can hold a different angle of attack when the path or the air changes.
This matters beyond bookkeeping. The wing stalls at its critical angle of attack, and the aerodynamics chapter is explicit that a wing can be brought to an excessive angle of attack at any airspeed, so the stall is about the wing, not about the nose attitude or the number on the airspeed indicator.
Pitch and power together
The Handbook splits attitude control into four components: pitch control, bank control, power control and trim. In level flight, pitch and power are the inputs that manage the two outputs pilots watch, altitude and airspeed, and each input reaches the other's variable:
- Raise the angle of attack and lift rises, so the aircraft climbs and airspeed tends to fall.
- Add thrust in level flight and the aircraft speeds up, lift increases, and it starts to climb unless the angle of attack is reduced just enough to hold the lift-weight balance.
- Reduce thrust and the aircraft slows, which requires a growing angle of attack to keep holding altitude, right up to the critical angle if the reduction continues.
Because of this coupling, the classroom shorthand that "pitch controls airspeed and power controls altitude" is a teaching simplification, not a universal rule. It is a useful starting point for trimming out a cruise, and it is not physics: the aircraft responds to attitude, angle of attack, thrust, weight and configuration together, and every input moves both variables at once.
Holding altitude and airspeed
Attitude flying runs as a short, repeating loop: fix a reference point on the aircraft against the natural horizon, note the attitude, then validate the performance with a brief look at the instruments. If the altimeter trends away from the target, the Handbook's instruction is to readjust the pitch attitude against the horizon first, then cross-check that altitude is being corrected or held.
Four habits keep the loop honest:
- Correct early and small. Deviations are easiest to catch while they are still slight; the Handbook's common-error list includes failure to make timely and measured inputs.
- Set the attitude, then read the result. Instruments confirm where the outside reference put you; they are not the place you chase the aircraft around.
- Hold the power steady while you judge. With power unchanged, steady airspeed follows almost by itself, so a speed wander usually points back at pitch or configuration.
- Use both wingtips. Fixating on the nose hides a bank the wingtips would show at once, and fixating on one side pulls unconscious control pressure with it.
Trim and control pressure
Trim exists to relieve sustained control pressure after a desired attitude has been established. Elevator trim, the usual type in light aircraft, nulls the pressure the pilot is holding so the aircraft stays in the chosen pitch attitude without force on the controls. The order matters, and the Handbook is unambiguous about it:
- Establish the attitude you want with normal control pressures.
- Hold it there.
- Trim out the remaining pressure so the attitude stays put on its own.
Trim is a pressure relief, not a flight control. The Handbook calls attempting to fly the aircraft with the trim a common fault in basic flying technique, even among experienced pilots, and warns that over-controlling with trim adjustments is its own error. Corrections still start and stop at the control columns: you change the attitude, then you re-trim. A properly trimmed aircraft is also why straight and level needs almost no control pressure in smooth air, and why a light, fingertip touch rather than a tight grip is taught from the first lesson: pressure you are fighting against is pressure you cannot feel.
The cross-check and common errors
The integrated method in the Handbook devotes roughly 90 percent of attention to outside references and no more than about 10 percent to brief instrument checks: control the attitude by the horizon, confirm the performance on the panel, then look out again. The scan is a tight loop of attitude, altitude, airspeed and heading, and its job is agreement. When the instruments tell one consistent story, the aircraft is doing what you think; when they disagree, the disagreement is information.
That scan is also how the classic errors get caught early:
| What you see | What is really happening |
|---|---|
| Altitude oscillating while you stare at the panel | Chasing the instruments instead of setting the attitude outside and confirming it briefly |
| A heading held with rudder, one wing low | Directional correction without coordinated aileron and rudder |
| Large, jerky inputs in both directions | Mechanical pushing and pulling instead of measured pressure, often with a tight grip |
| A drift you only notice on the map | Heading watched, track ignored: the crosswind has been working the whole time |
| Attitude changes that need force to hold | The attitude was set but not trimmed out, so the pilot is fighting the aircraft |
Only the drift row comes from outside the Handbook itself: it is the navigation consequence of watching the heading and ignoring the track, from the navigation chapter of the Pilot's Handbook.
If the horizon cannot be seen, this visual method does not apply: flying without an outside reference is instrument flight, a separate discipline not covered here and one that belongs in proper training.
Worked example: two quiet corrections
You are cruising with the power set and unchanged, on heading 090 and intending to track course 090.
-
A developing altitude deviation. Through 4,000 feet the altimeter starts unwinding and the vertical speed indicator sits at 500 feet per minute down. How long until you are 100 feet low?
Twelve seconds is not a crisis, but it is the whole budget: raise the pitch attitude slightly against the horizon, then confirm on the altimeter that the trend has stopped. Because the power setting has not changed, the airspeed settles back toward the steady value that belongs to that attitude and power setting (the Handbook's constant-power observation). The altitude and rate readings are scenario values, not performance data for any aircraft.
-
A track that will not sit still. Heading holds 090, yet the map shows a track of 094: wind from your left has put a 4 degree drift angle between heading and track. To make the track coincide with the course, point the nose 4 degrees into the wind:
Fly heading 086 and the track returns to 090. The heading changed, the track became the line you wanted, and nothing about the attitude or power needed to change at all. The numbers are illustrative; real drift depends on the wind you are actually flying in.
Common misconceptions
"Straight and level means one fixed airspeed." It means heading and altitude held steady. Airspeed stays practically constant only while the power setting is constant, and level flight is sustainable across a wide range of speeds.
"Pitch attitude and angle of attack are the same number with two names." They are measured against different references: the horizon and the relative wind. They track each other closely only in steady level flight, which is exactly why the confusion survives.
"Pitch always controls airspeed, power always controls altitude." A simplification that helps set up a cruise, not a rule of physics. Both inputs move both variables; the aircraft answers to attitude, angle of attack, thrust, weight and configuration together.
"Trim flies the aircraft, so the pilot can relax." Trim relieves sustained pressure so a chosen attitude can be held cheaply. It does not replace control input, monitoring or correction; flying the aircraft with the trim is a recognised basic-flying fault.
"I am holding my heading, so I am on course." Heading and track are the same only in still air. In wind, the track walks off the course unless a wind correction angle keeps the nose pointed correctly.
Recap
- Straight-and-level flight is flight in which heading and altitude are maintained: two jobs, two sets of references.
- Pitch attitude (against the horizon), angle of attack (against the relative wind) and flight path (where the aircraft is going) are three separate quantities: only in steady level flight does the flight path sit horizontal while pitch attitude and angle of attack rise and fall together.
- Pitch and power act on each other's variables: use them together, and treat "pitch for airspeed, power for altitude" as a teaching aid rather than a law.
- With power held constant, airspeed stays practically constant, so altitude and heading are managed by attitude and verified briefly on the instruments.
- Trim relieves sustained control pressure after the attitude is established; it never replaces the control inputs themselves.
- In wind, heading and track differ by the drift angle, so a steady heading alone does not hold your line over the ground.
Where this connects next: the lessons on basic flight instruments and on reading the Garmin G1000 show how the same attitude, altitude and heading appear on a panel, and understanding airspeed explains the speed side of the loop. EASA's Part-FCL syllabus lists the same manoeuvre as Exercise 6, straight and level: pitch control with trim, use of power at selected air speeds and instrument precision. Hands-on practice belongs in the simulator track, where holding a heading and an altitude in a calm, repeatable session builds the feel the Handbook describes. Simulator practice teaches these general principles, but it is not a substitute for real flight instruction, and any aircraft-specific technique, speed or setting must come from that aircraft's approved documentation and a qualified instructor.
Sources and further reading
- FAA: Airplane Flying Handbook (FAA-H-8083-3C), Chapter 3: Basic Flight Maneuvers (opens in a new tab)Accessed 15 October 2026
- FAA: Pilot's Handbook of Aeronautical Knowledge (FAA-H-8083-25C), Chapter 5: Aerodynamics of Flight (opens in a new tab)Accessed 15 October 2026
- FAA: Pilot's Handbook of Aeronautical Knowledge (FAA-H-8083-25C), Chapter 16: Navigation (opens in a new tab)Accessed 15 October 2026
- EASA: Easy Access Rules for Aircrew (Regulation (EU) No 1178/2011), Revision from November 2025 (opens in a new tab)Accessed 15 October 2026
Last editorial review: 17 October 2026. Authored 15 October 2026.
Knowledge check: Straight and Level: Attitude, Power and Trim
Answer 6 questions to check what you learned. These are original Jonas Aviation practice questions: not official examination questions, and they grant no credit toward any certificate.
Finished this lesson?
Mark it complete to track your progress through the course on this device.
That is every published lesson in this course for now. Back to the course to see what is coming next. Further lessons are in editorial review.