Understanding Angle of Attack and Stalls
The one variable the wing actually responds to: what angle of attack is, how lift changes as it grows, why exceeding the critical angle stalls the wing at any airspeed and in any attitude, and why loading, bank angle and coordination move the stall speed but never the critical angle.
Independent educational resource; not approved flight training. Jonas Aviation is not an approved training organisation, and nothing on this page replaces formal instruction or approved aircraft manuals.
What you will learn
- Define angle of attack between the chord line and the relative wind, and explain why the relative wind follows the flight path rather than the horizon.
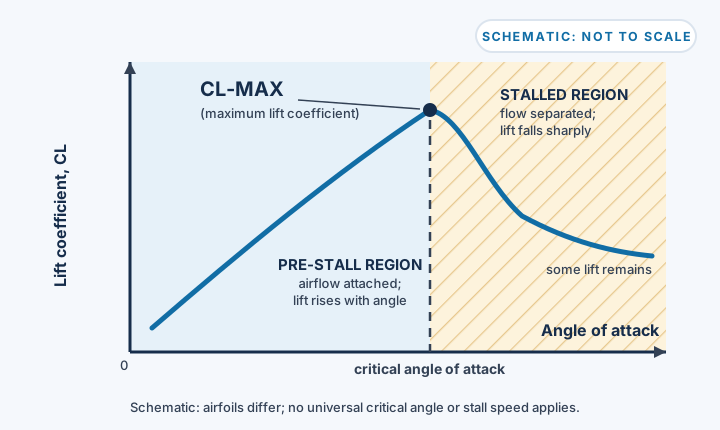
- Describe how the lift coefficient rises with angle of attack to CL-MAX and then falls as the airflow separates from the wing.
- Explain why a stall is caused only by exceeding the critical angle of attack and why that makes stalls possible at any airspeed, attitude or power setting.
- Distinguish the fixed critical angle of attack from the stall speed that moves with weight, configuration, load factor and contamination.
- Explain how bank angle and load factor raise the stall speed in a turn, why uncoordinated flight stalls one wing first, and state the conceptual recognition and recovery principle of reducing the angle of attack.
On this page
Every flight depends on one wing behaving predictably: airflow attaching to it, producing the lift that holds the aircraft up. This lesson explains the single variable that governs that behaviour, the angle of attack, and what happens when it grows too large. It proves the claim the straight-and-level lesson ended on: a stall is about the wing, not about the nose attitude or the number on the airspeed indicator. It also explains why the airspeed at which a given aircraft stalls is never one fixed number, and what bank angle and loading have to do with it.
The angle the wing feels
The straight-and-level lesson separated three quantities that beginners often blur, and this lesson runs on the second one:
| Quantity | What it is measured against | What it describes |
|---|---|---|
| Pitch attitude | The natural horizon (or the attitude indicator's horizon line) | Where the nose sits relative to the horizon |
| Angle of attack | The relative wind: the direction the air meets the wing | How hard the wing is working: what the wing feels |
| Flight path | The air mass around the aircraft | Where the aircraft is actually going |
Angle of attack is the acute angle between the wing's chord line (the imaginary straight line from the leading edge to the trailing edge) and the relative wind, the direction of the airflow meeting the wing. The important detail is that the relative wind follows the flight path, pointing backwards along it, not the horizon, so the same pitch attitude can sit at a completely different angle of attack whenever the flight path is not level. Pitch attitude is what you see out of the window; angle of attack is what the wing experiences. This is why a stall has almost nothing to do with the nose being "up": a nose high can mean a small angle of attack in a brisk climb, and a shallow nose can hold a large one in a descent.
How lift changes as the angle grows
The lift lesson gave the relationship: lift depends on air density, wing area, the square of the airspeed, and a dimensionless number that captures how efficiently the wing is working at that moment, the lift coefficient. Angle of attack is the main thing the pilot moves that coefficient.
Over most of the usable range the story is almost linear: increase the angle of attack and the lift coefficient rises with it, and the wing bites the air harder. This is the range every aircraft flies in, and it is why raising the nose at a constant power setting trades airspeed for altitude.
But the curve does not rise forever. As the angle keeps increasing, the airflow over the upper surface has to turn more sharply to stay attached, and at some point it can no longer hold on: the flow separates from the surface. On the well-rounded leading edge typical of training wings, that separation starts near the trailing edge and spreads forward as the angle grows. Lift peaks at a point the FAA handbook calls CL-MAX, the maximum lift coefficient, and past that peak it drops off dramatically while drag keeps climbing. The wing has stopped working efficiently, and soon stops working adequately at all.
The critical angle of attack
That separation point has a name. The critical angle of attack is the angle at which the airflow over the wing separates and the stall begins. Three properties of it carry most of this lesson's weight:
- Each wing has one. For a given wing in a given configuration, the stall happens at one specific angle of attack. The Pilot's Handbook puts it plainly: a given aircraft always stalls at the same angle of attack regardless of airspeed, weight, load factor or density altitude.
- It is a property of the shape, not the situation. Typical training-type airfoils reach their critical angle somewhere around 16 to 20 degrees, depending on the design, but the exact figure belongs to that particular wing. It is not a number pilots carry for "all aircraft", and no two designs are required to match.
- It is the only thing that matters for the stall itself. An aerodynamic stall results from a rapid decrease in lift caused by the separation of airflow from the wing's surface, brought on by exceeding the critical angle of attack. Nothing else is on the list: not the airspeed, not the pitch attitude, not the direction of flight.
The Airplane Flying Handbook's upset-prevention chapter states the consequence in one sentence: it is possible to exceed the critical angle of attack at any airspeed, at any attitude and at any power setting. A stall can happen at high speed in a sharp pull-up, at low speed in a descent, in level flight, in a climb, with the engine at full power. The wing does not know any of that. It only knows its angle to the air.
Why the stall speed keeps moving
If the stall is one angle, why does every aircraft have a family of published stall speeds instead? Because airspeed is only how we reach that angle. The lift equation ties speed to lift, so if the lift the wing must produce changes, the speed at which the critical angle arrives changes with it. The Pilot's Handbook identifies the situations where the critical angle is most frequently exceeded: low speed, high speed, and turning.
| Situation | How the critical angle gets exceeded | What actually moved |
|---|---|---|
| Slowing down in level flight | The aircraft is heavy, so the wing needs a lot of lift at low speed, and the pilot keeps raising the angle of attack until separation arrives | The airspeed fell until the required angle reached critical |
| A sharp pull-up from a dive | The flight path curves abruptly; the wing's angle jumps from small to very large in an instant, far above the speed at which a gentle stall would occur | The manoeuvre forced the angle, not the speed |
| A banked turn | The wing must carry more than the aircraft's weight, so it runs at a larger angle the whole time, and the stall arrives at a higher airspeed than in straight flight | The loading changed, so the speed margin shrank |
This is the distinction the whole lesson turns on: the critical angle of attack is fixed; the stall speed is not. Published stall speeds are quoted for a particular weight and configuration, exactly as the airspeed lesson showed in its family of speeds. Fly heavier than the quoted condition, or in a steeper bank, and the same aircraft stalls at a higher indicated airspeed than the book number. The number on the dial never tells you the angle; it only helps you guess at it.
One more passenger rides along here: contamination. Ice, frost or snow on the upper wing disrupts the smooth flow the wing depends on, so the airflow separates at a smaller angle than normal: the wing now stalls "early", at a higher speed than expected, while the ice's added weight also raises the lift the wing must produce. The Pilot's Handbook quantifies how little ice it takes: as little as 0.8 millimetres of ice on the upper wing surface increases drag and reduces aircraft lift by 25 percent.
Loading, bank angle and coordinated flight
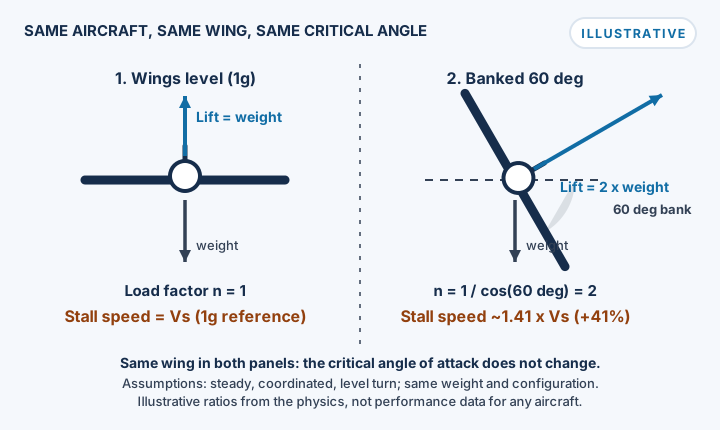
The turn case deserves its own walk through, because it is where most stall surprises are built. In any turn the lift vector tilts: its vertical component still has to balance the aircraft's weight while the horizontal component pulls the aircraft around the curve, so the total lift must be greater than the weight. The ratio of total lift to weight is the load factor, and in a steady level turn it depends only on the bank angle: the load factor equals 1 divided by the cosine of the bank angle.
A shallow bank barely changes anything. At a 60 degree bank the mathematics of the turn gives a load factor of 2: the wing is now carrying twice the aircraft's weight. Because lift at the stall goes with the square of the airspeed, the speed at which the critical angle arrives rises with the square root of the load factor. Worked through in the example below, that is a stall speed about 41 percent higher than in straight and level flight, all of it available to ambush a pilot watching an airspeed indicator quoted for straight flight. EASA's theoretical knowledge syllabus for the PPL(A) (AMC1 FCL.210; FCL.215) lists bank angle and load factor together under steady coordinated turns for the same reason: they are one idea, not two.
Bank angle alone, though, is not the whole story, which brings in the last ingredient: coordination. In a properly coordinated turn each wing sits at the same angle of attack, and both wings then tend to stall nearly simultaneously. Slip or skid the turn and the two wings part company: the aircraft flies slightly sideways, so one wing has a higher angle of attack and reaches critical first, while the other is still lifting. That wing drops. The FAA handbook notes this asymmetry in its stall discussion, and it is why an uncoordinated stall is so unforgiving. Coordination is stall hygiene as well as comfort.
Stall awareness in principle
EASA's Part-FCL syllabus lists stalling as its own flight exercise (Exercise 10b in AMC1 FCL.210), built around exactly the progression a beginner needs: safety checks, symptoms, recognition, and recovery. This lesson covers the middle two in theory, because recognising a stall starts with believing the signs the aircraft gives you.
The symptoms are aerodynamic, not decorative. As the flow begins to separate, the wing's lift gets unsteady: the aircraft buffets, vibrating gently as the separated air washes over the tail. The controls feel vague and mushy as the airflow over them slackens. Training aircraft carry an audible stall warning that sounds before the critical angle is reached: the Airplane Flying Handbook notes that stall warning devices alert the pilot when approaching the critical angle, and that an impending stall can include buffeting, a stick shaker or an aural warning. Stall training spans the period from the first stall warning to the stall itself, so its instruction is simple: pilots should react to and correct for any stall indication. In the framework of the straight-and-level cross-check, the aircraft is telling you that the angle you think you are holding and the angle the wing actually has have started to diverge.
And the recovery, stated at the conceptual level the sources support, is one principle rather than a checklist: reduce the angle of attack. The upset-prevention chapter calls reducing the angle of attack the most important action in response to an impending or full stall. Everything else a particular aircraft's procedure might involve belongs to that aircraft's documentation and to instruction with a qualified teacher; what belongs here is the physics. The separation ends when the angle drops back below the critical value, the airflow reattaches, and the wing begins flying again. Notice what the principle does not say: it does not mention airspeed. The airspeed recovers as a result of the wing flying again, not as the target of the manoeuvre.
Worked example: the margin you cannot see on the dial
You are practising turns in a simulator, trimmed and steady, and you note the indicated airspeed at which the stall warning first sounds in straight and level flight. Call that reference speed Vs. Two questions.
-
The banked turn. You roll into a steep 60 degree bank and hold the altitude. The load factor is
The wing now carries twice the weight, so the stall arrives at a speed higher than Vs by the square root of the load factor:
The warning will now sound about 41 percent above the straight-flight figure, even though nothing about the wing or its critical angle has changed. Any speed between Vs and that raised figure that felt perfectly safe a minute ago is now inside the margin. Both numbers are illustrative ratios from the physics, not performance data for any particular aircraft.
-
The same attitude, a different angle. You hold the pitch attitude you use in level flight, but the aircraft has settled into a descent because the power was reduced. The flight path points down, so the relative wind comes from slightly below and the angle of attack is smaller than it was in level flight at the same pitch. Now pull the nose up to the old attitude while the flight path is still descending: for a moment the angle of attack is considerably larger than before, measured against a relative wind that still follows the old path. If the aircraft is also slow and loaded, that moment can pass through the critical angle. Same attitude on the panel, three different angles on the wing, depending on where the aircraft was actually going.
Common misconceptions
"Stalls happen when you fly too slowly." Low speed is the most familiar route to a high angle of attack, but the Handbook's own examples include a stall during a sharp pull-up at high speed: the stall happens at the critical angle, and the pilot can arrive there at any airspeed.
"A stall means the nose is pointed at the sky." Angle of attack is measured against the relative wind, not the horizon. An aircraft descending nose-low can be close to the critical angle, and an aircraft climbing steeply can be well below it.
"When the wing stalls, it stops producing lift." Lift drops dramatically past CL-MAX, but the wing keeps producing some lift. That is precisely why stalls are recoverable, and why believing the opposite makes pilots slow to react.
"Every aircraft stalls at about the same angle." Training-type airfoils cluster around roughly 16 to 20 degrees, but the critical angle is set by each wing's design: one fixed value for one wing, not a universal constant to memorise.
"The book stall speed tells me exactly how close I am to a stall." It tells you the speed at which the critical angle is reached in one stated weight and configuration. Change the loading, the bank or the configuration and the number moves, while the critical angle does not. The angle of attack, not the dial, is the truth about the wing.
Recap
- Angle of attack is the angle between the wing's chord line and the relative wind, and the relative wind follows the flight path, not the horizon: the same pitch attitude can hold different angles of attack.
- Lift rises with angle of attack up to CL-MAX, then drops sharply as the airflow separates; the wing keeps producing some lift throughout.
- A stall is exceeding the critical angle of attack: one specific angle for a given wing, reachable at any airspeed, attitude or power setting.
- The critical angle is fixed; the stall speed is not. Weight, configuration, load factor and contamination all move the speed at which that angle arrives.
- In a banked turn the load factor grows with the bank, so the wing reaches its critical angle at a higher airspeed; uncoordinated flight makes one wing exceed it first, so the wing drops.
- Stall awareness is recognising the symptoms (buffet, vague controls, the stall warning) and knowing the single principle behind recovery: reduce the angle of attack. Practising it belongs with a qualified instructor or in a simulator.
Where this connects next: the airspeed lesson's family of stall speeds is now explained from the wing side, and the straight-and-level lesson's picture of pitch attitude, angle of attack and flight path is what this lesson's "same attitude, different angle" reasoning was built on. EASA's Part-FCL syllabus teaches the practical form of all this as Exercise 10a, slow flight, and Exercise 10b, stalling (both in AMC1 FCL.210), in that order, with spin avoidance following separately, which is exactly why this lesson stays on the theory side of that line. Hands-on feel comes from the simulator track, where a calm, repeatable session watching an angle of attack approach its peak teaches the symptoms better than any description. Simulator practice teaches these general principles, but it is not a substitute for real flight instruction, and any aircraft-specific technique, speed or setting must come from that aircraft's approved documentation and a qualified instructor.
Sources and further reading
- FAA: Pilot's Handbook of Aeronautical Knowledge (FAA-H-8083-25C), Chapter 5: Aerodynamics of Flight (opens in a new tab)Accessed 17 October 2026
- FAA: Pilot's Handbook of Aeronautical Knowledge (FAA-H-8083-25C), full handbook PDF (source of the Chapter 5 quotes, Phase 10C-R) (opens in a new tab)Accessed 18 October 2026
- FAA: Airplane Flying Handbook (FAA-H-8083-3C), Chapter 5: Maintaining Aircraft Control: Upset Prevention and Recovery Training (opens in a new tab)Accessed 17 October 2026
- EASA: Easy Access Rules for Aircrew (Regulation (EU) No 1178/2011), Revision from October 2026 (opens in a new tab)Accessed 17 October 2026
- EASA: Easy Access Rules for Aircrew (Regulation (EU) No 1178/2011), Revision from October 2026, direct PDF (AMC1 FCL.210 and AMC1 FCL.210; FCL.215 syllabus pages, Phase 10C-R) (opens in a new tab)Accessed 18 October 2026
Last editorial review: 18 October 2026. Authored 17 October 2026.
Knowledge check: Understanding Angle of Attack and Stalls
Answer 6 questions to check what you learned. These are original Jonas Aviation practice questions: not official examination questions, and they grant no credit toward any certificate.
Finished this lesson?
Mark it complete to track your progress through the course on this device.
That is every published lesson in this course for now. Back to the course to see what is coming next. Further lessons are in editorial review.